To create a new SAM in DB/Assist you must complete the New SQL Access Module dialog box to specify the following:
•Name (required)
•Database (required)
•Description (optional)
You must assign a name to each SAM. You can specify a base name of up to eight characters. DB/Assist appends the extension .SAM to this base name. We recommend that you choose a name that is unique among all SAMs associated with a single ESL Application.
The SAM name must also conform to the rules for naming ESL identifiers, which are user-defined names for specific parts in your ESL program. For a list of these rules, see the Keywords and Identifiers in the Programmers Guide for the ESL Language.
You must associate a SAM with a database. Each SAM can be associated with only one database at a time. This means that the statements in the SAM can reference tables and columns from only a single database. DB/Assist compiles all of the statements in the SAM using the selected database, and creates a bind file and access package for the SAM associated with that database.
In general, you should not change the database associated with a SAM while creating it in DB/Assist. Under certain circumstances, however, you may be able to associate another database with the SAM as long as it has the same table and column structure as the previously associated database. For more information about when and how to change a SAM's database, see Changing_SAM_Settings.
When creating a SAM, you can specify an optional description of any length. You can use the description to supply useful information about the SAM, such as the following:
•Name of the developer who created it
•Functional area it addresses in the application
•Database and/or tables it accesses
To create a new SAM in DB/Assist, follow these steps. This procedure assumes that you have already started DB/Assist as described in Starting DB/Assist.
1. Select SQL Access Module 4 New or the New SAM button. The New SQL Access Module dialog box appears.
1.Type a name for the SAM in the Name entry field. The extension for the SAM name is .SAM.
2.Select the database to be associated with this SAM from the Database drop-down list. The name of the database you selected appears in the Database field.
3.If desired, type a description of the SAM in the Description field.
The following shows an example of a completed New SQL Access Module dialog box for a SAM named ADMIN associated with the SAMPLE database.
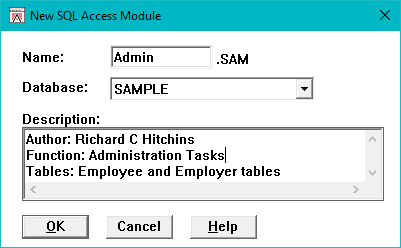
New SQL Access Module Dialog Box
4.Select the OK push button in the New SQL Access Module dialog box. DB/Assist creates the SAM, connects to the specified database, and associates the SAM with this database. If you have not already logged on to DB2, the following Login dialog box appears.
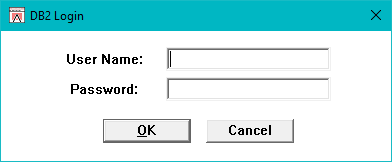
Login Dialog Box
1.Type your user ID in the User ID entry field. During your DB/Assist session, your User ID must have been grant appropriate access rights to the tables, which you intend to include in your SQL statements otherwise, you cannot run SQL statements or compile the statements.
2.Type your password in the Password entry field.
3.Select the OK push button in the Logon dialog box. If the logon is successful, DB/Assist connects to the specified database. The pathname of the SAM appears in the title bar of the DB/Assist Main Window. If the logon is unsuccessful, a message box appears indicating this. Respond to this message in one of the following ways:
•If you need help, select the Help push button in the message box to invoke DB2/2 Help.
•If you do not need help, select the OK push button in the message box to return to the Logon dialog box Correct your problem and logon again.
If you specify a SAM name that already exists, DB/Assist displays a message box indicating that the SAM already exists and asking if you want to replace it. Respond to this message in one of the following ways:
•Select the Yes push button to replace the existing SAM with the new SAM
•Select the No push button to cancel the operation.