The Variable List in the Link Variables dialog box displays the names of predefined variables. The variable definitions come from an existing file that you specify by selecting the Variable File push button.
After you specify the variable file, the variables in this file appear in the Variable List, filtered by the variable types checked. You can display a particular variable type in this list by checking any combination of the String, Integer, and Float check boxes. Only variables of the type or types you checked will then appear in the Variable List.
The following example shows the contents of a variable file named TEST552.VAR that contains variable definitions for the UpdateStaff statement:
float COMM_FV
integer DEPT_IV
integer EMPID_IV
integer ID_IV
string JOB_SV
string NAME_SV
float NEWSALARY_FV
float SALARY_FV
integer YEARS_IV
To link a column with a predefined variable when running DB/Assist standalone, follow these steps:
1.If you have not already done so, select SQL Statement Ø Link variables or the link variables button.
The Link Variables dialog box appears. The qualified column names in the statement appear in the Columns/Variables table.
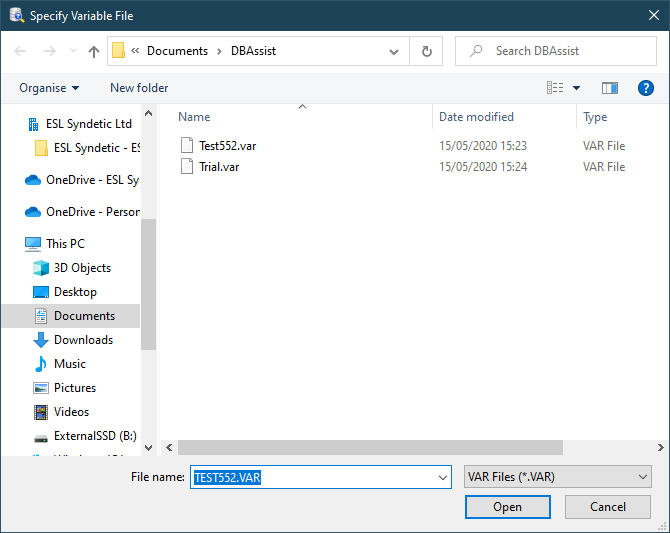
2.Select the Variable File push button.
The Specify Variable File dialog box appears, as shown below. The default filename in the Open filename entry field is the SAM name with a .VAR extension.
Specify Variable File Dialog Box
1.Navigate to the directory where the variable file is stored.
The names of the files in that directory appear in the File list box
2.Specify the variable file in any of the following ways:
•Double-click on the filename in the File list box
•Select the filename in the File list box. Then select the OK push button.
•Type the filename in the Open filename entry field or accept
the default filename. Then select the OK push button.
The Specify Variable File dialog box closes. The variable names contained in the file appear in the Variable List, filtered by the selected type(s).
5.If desired, filter the Variable List by checking one or more of the following boxes to display the variable types you need:
•String (checked by default)
•Integer
•Float
3.Select the column to which you want to link a variable.
4.Select the variable in the Variable List to which you want to link the selected column.
The variable you selected is linked to the selected column, as shown below.
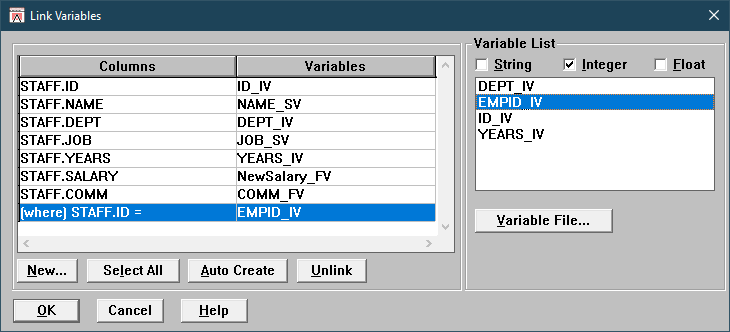
Link Variables Dialog Box with Linked Variable
In this example, we linked the (where) STAFF.ID = column with a predefined integer variable named EMPID IV. We used the Auto Create push button to automatically create variables for the other columns, except for the Salary column, which we created using the New variable facility.
If you want to change a variable association before closing the dialog box, select the row containing the column name and variable that you want to change. Then, select another variable to replace the previous one.
5.Repeat Steps 5 through 7 for each column that you want to link.
6.Select the OK push button.
DB/Assist updates the SAM containing this statement with the variable associations.
In the SQL Editor window, DB/Assist replaces the parameter markers in the UpdateStaff statement with the variables you specified in the Link Variables dialog box, as follows. Notice that each variable is preceded by a colon ( : ) to indicate that it is an ESL host variable.
UPDATE DB2ADMIN.STAFF
SET ID = :ID_IV, NAME = :NAME_SV, DEPT = :DEPT_IV, JOB = :JOB_SV, YEARS = :YEARS_IV, SALARY = :NewSalary_FV, COMM = :COMM_FV
WHERE DB2ADMIN.STAFF.ID = :EMPID_IV
If necessary, you can select Options Ø Word wrap to format the text in the SQL Editor window so the entire statement is visible.