There are two ways that you can link variables to statements in DB/Assist:
•Use the Link Variables dialog box, as described in Linking Variables. This method is recommended for all users.
•Type the variables into an existing statement displayed in the SQL Editor window. This method, though not recommended, can be performed by more advanced users.
This section describes the reasons why you should use the Link Variables dialog box, and explains what happens if you type variables in the SQL Editor window.
To link statements to ESL variables when running DB/Assist, we recommend that you use the link Variables dialog box instead of typing the variables in the SQL Editor window. The reasons for this follow.
•The Link Variables dialog box provides an easy-to-use, graphical interface for linking statement columns to new and existing ESL variables.
•Using the Link Variables dialog box reduces the likelihood of creating typing or spelling errors in variable names.
•When you use the Link Variables dialog box, DB/Assist verifies that each column is linked to an ESL variable of the appropriate type. DB/Assist does not perform this verification for variables entered in the SQL Editor window.
•If you create a multi-row SELECT, statement, you must use the Link Variables dialog box to link the statement to variables. Variables typed in the SQL Editor window for a multi-row SELECT statement produce invalid SQL syntax
If you are thoroughly familiar with DB2 SQL syntax and prefer to build statements manually in the SQL Editor window, it is possible to type the name of a new variable directly into an existing statement displayed in the SQL Editor window.
If you type a new variable in the SQL Editor window and this variable does not already exist in the current current SAM, DB/Assist displays the Assign Variable Types dialog box so you can assign a type to the variable. This dialog box appears when you perform certain actions, such as attempting to verify, compile, or save the SAM.
For example, Figure 7-16 shows the Assign Variable Types dialog box that would appear if you type integer variables named NewDept_IV, Years_IV, string variables named Name_SV, NewJob_SV and float variables named Salary_FV, Comm_FV into the InsertStaff statement in the SQL Editor window.
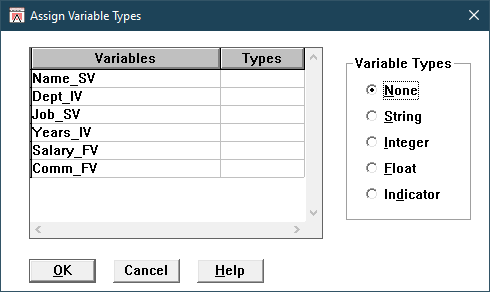
Assign Variable Types Dialog Box
To complete the Assign Variable Types dialog box, follow these steps:
1. Select the variable in the Variables column to which you need to assign a type.
2. Assign the appropriate type to the variable by selecting one of the following Variable Type radio buttons:
•String
•Integer
•Float
•Indicator
The appropriate variable type appears in the Types column next to the selected variable.
If you want to change a variable assignment before closing the dialog box, select the row containing the variable and type that you want to change. Then, select the radio button for the desired variable type. The new variable type replaces the one you previously selected.
1.Repeat Steps 1 and 2 to assign a type to each variable in the list.
For example, below shows the completed Assign Variable Types dialog box for the new variables detailed above.
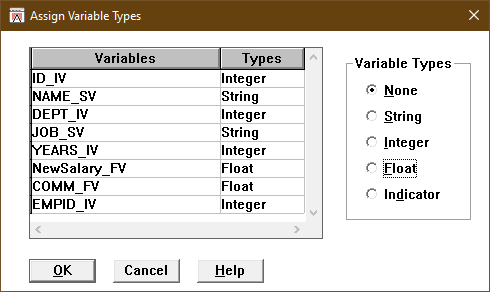
Completed Assign Variable Types Dialog Box
2.Select the OK push button.
The Assign Variable Types dialog box closes, and DB/Assist assigns the specified variables and types to the current SAM.