DB/Assist enables you to build SQL SELECT, UPDATE, DELETE, and INSERT statements visually by completing easy-to-use statement construction dialog boxes.
After you complete the New SQL Statement dialog box, as described in Creating a New SQL Statement, DB/Assist stores the name, type, and optional description you specified. Then, when you select SQL Statement Ø Tables or the Tables button to begin building the statement visually, the correct statement construction dialog box for your statement type appears, as listed in the following table.
If you specify Other as the statement type in the New SQL Statement dialog box, all statement construction and linking buttons and menu choices are disabled. You build the statement by typing it in the SQL Editor window.
For this statement type... |
This dialog box appears: |
SELECT (Multi-Row or Single-Row) |
SELECT/FROM Clause |
UPDATE (Searched or Positioned) |
UPDATE/SET Clause |
DELETE (Searched or Positioned) |
DELETE/FROM Clause |
INSERT |
INSERT/INTO Clause |
After you build a basic SELECT, UPDATE, DELETE, or INSERT statement, you can complete other statement construction dialog boxes to further refine the statement. These dialog boxes are listed in the following table.
Use This Dialog Box... |
To Build: |
Computed Column |
A computed column (expression) as part of a SELECT statement. |
WHERE Clause |
A WHERE clause for a SELECT, searched UPDATE, or searched DELETE statement. |
WHERE CURRENT OF Clause |
A WHERE CURRENT OF clause to specify the cursor name for a positioned UPDATE or positioned DELETE statement. |
Join Clause |
A join clause for a SELECT statement. |
GROUP BY Clause |
A GROUP BY clause for a multi-row SELECT statement. |
HAVING Clause |
A HAVING clause as part of a GROUP BY clause for a multi-row SELECT statement. |
ORDER BY Clause |
An ORDER BY clause for a multi-row SELECT statement. |
To build a SQL SELECT, UPDATE, DELETE, or INSERT statement visually by completing the statement construction dialog boxes, follow these general steps:
1. Select SQL Statement Ø Tables or the Tables button.
The statement construction dialog box that corresponds to your statement type appears, as described in the preceding table. The names of the tables and views in the database to which you are connected appear in the Table list box
For example, if you are connected to the SAMPLE database that comes with DB2, The following shows how the SELECT/FROM Clause dialog box might look when you first open it.
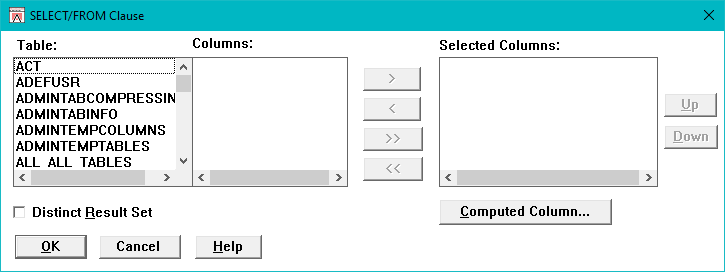
SELECT/FROM Clause Dialog Box
1.Complete the dialog box as described in the appropriate section of Managing SQL Statements.
The statement syntax appears in the SQL Editor window.
2.If appropriate for your statement, complete additional dialog boxes to add computed columns, WHERE clauses, join clauses, GROUP BY clauses, HAVING clauses, and ORDER BY clauses to further refine your statement. (For information about completing these dialog boxes, see the relevant section of Managing SQL Statements.)
The syntax you construct in these dialog boxes is added to the statement in the SQL Editor window.
As DB/Assist builds the SQL statement in the SQL Editor window, you can use the Cut, Copy, Paste, Undo, and Validate push buttons described in SQL Editor Window and Push Buttons to edit or validate the statement syntax.