This section describes how to use the DB/Assist dialog boxes to build a SQL INSERT statement. An INSERT statement inserts one row of data into a single table.
When you build an INSERT statement for a particular table in DB/Assist, all required columns in that table must be part of the INSERT statement. A required column is one that cannot contain null values, and has been defined in the CREATE TABLE statement with the NOT NULL attribute.
To ensure that all required columns in the table appear in an INSERT statement, DB/Assist checks that all required columns appear in the Selected Columns list box when you build the statement.
If you attempt to build an INSERT statement that does not include one or more required columns, DB/Assist displays a message box indicating that it will automatically add any unselected required columns to the INSERT statement.
After you build an INSERT statement, DB/Assist displays question marks ?) as part of the statement syntax in the SQL Editor window. These question marks are parameter markers, which are placeholders that you will replace with ESL host variables when you link variables to the statement, as described in Linking Variables to SQL Statements.
In order to dynamically run an INSERT statement, you must replace the parameter markers with specific values. To do so, supply values for the parameter markers in the Input Values dialog box when you run the statement, as described in Using the Input Values Dialog Box.
The following INSERT statement inserts a new row into the Staff table:
INSERT INTO DB2ADMIN.STAFF STAFF
(ID,NAME,DEPT,JOB,YEARS,SALARY,COMM)
VALUES (?,?,?,?,?,?,?)
To build this INSERT statement, follow these steps:
1.Select SQL Statement Ø Tables or the Tables button.
The INSERT/INTO Clause dialog box appears, listing the tables in the connected database.
1.Select the STAFF table in the Table list box. (You can only select columns from a single table when building an INSERT statement.)
The columns in the STAFF table appear in the Columns list box
2.Select the >> push button to move all columns into the Selected Columns list box.
The names of all columns appear in the Selected Columns list box, as shown below.
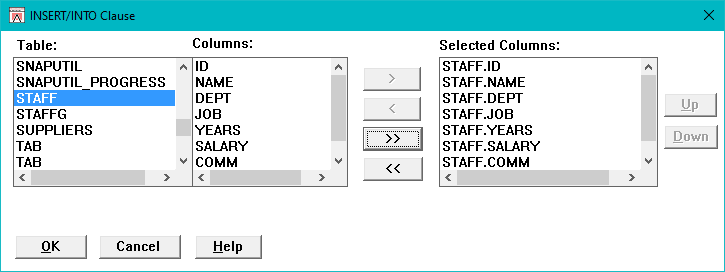
INSERT/INTO Clause Dialog Box
If you need more information about selecting tables and columns, see Selecting Tables and Columns for SELECT UPDATE and INSERT Statements.
3.Select the OK push button.
The dialog box closes. DB/Assist adds the INSERT statement to the SQL Editor window and to the SAM that contains this statement.