You can use the WHERE Clause dialog box to specify search conditions for the SELECT statement. The search conditions determine which rows the SELECT statement retrieves from the current database.
A basic WHERE clause consists of two expressions connected by a comparison operator, as follows:
WHERE expression1 operator expression2
An expression can be a constant, column name, function, ESL variable, subquery, or any combination of these elements connected by an operator. An operator is one of the comparison operators listed in the WHERE Clause dialog box.
The following sections describe how to use the WHERE Clause dialog box to:
•Build a basic WHERE clause.
•Specify multiple search conditions.
•Build a subquery.
•Use the BETWEEN and NOT BETWEEN operators.
•Use the EXISTS and NOT EXISTS operators.
The following SELECT statement retrieves the name and salary from the Staff table for a manager.
SELECT STAFF.NAME, STAFF.SALARY FROM DB2ADMIN.STAFF STAFF WHERE STAFF.JOB='Mgr'
To add the WHERE clause (shown in italics) to this SELECT statement, follow these steps:
1.Select SQL Statement Ø Where or the Where button.
The WHERE Clause dialog box appears. The table you selected in the SELECT/FROM Clause dialog box appears in the Table drop-down list, and the columns in this table appear in the Column list box.
2.If the name of the table you want does not already appear in the Table field, select it from the Table drop-down list. (This step is not required for the current example.)
The columns in the table you select appear in the Column list box
3.Select JOB in the Column list box The qualified column name appears in the Expression 1 entry field.
4.Select the = operator from the Operator list box.
5.Type the character string 'Mgr' in the Expression 2 entry field, enclosing it in single quotation marks. (If you prefer, you can select the' symbol from the keypad instead of typing it.)
Below shows the completed WHERE Clause dialog box for this statement.
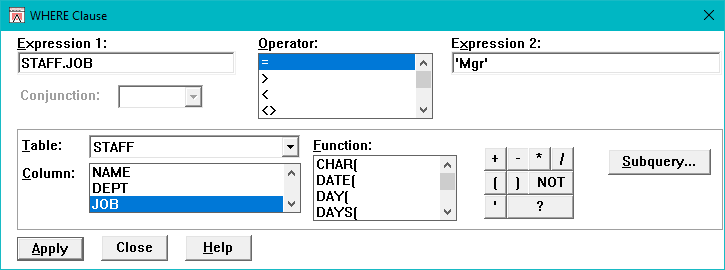
Basic WHERE Clause Dialog Box
6.Select the Apply push button.
DB/Assist adds the WHERE clause to the current SELECT statement in the SQL Editor window and to the SAM that contains this statement.
7.Select the Close push button or double-click on the system menu to close the dialog box.
If you do not want to add the WHERE clause to the current SELECT statement, select the Close push button at any point before selecting the Apply push button.
Specifying Multiple Search Conditions
You can use the conjunctions AND and OR to add multiple search conditions to an existing WHERE clause.
For example, the following SELECT statement starts with a basic WHERE clause and uses the AND and OR conjunctions to add other search conditions to it. The new statement retrieves only those rows where the division is Eastern and the location is either Boston or New York.
SELECT ORG.DEPTNUMB, ORG.DEPTNAME, ORG.DIVISION FROM DB2ADMIN.ORG ORG
WHERE ORG.DIVISION='Eastern'
AND ORG.LOCATION='Boston'
OR ORG.LOCATION='New York'
To add the search conditions (shown in italics) to the WHERE clause in this statement, follow these steps:
8.If the WHERE Clause dialog box is not already open, open it by selecting SQL Statement Ø Where or the Where button.
The WHERE Clause dialog box appears with AND in the Conjunction drop-down list.
9.Select LOCATION in the Column list box.
The qualified column name appears in the Expression 1 entry field.
10.Select the = operator from the Operator list box.
11.Position the cursor in the Expression 2 entry field and type the character string 'Boston', enclosing it in single quotation marks.
12.Select the Apply push button.
DB/Assist adds the first search condition to the current SELECT statement.
13.Select OR from the Conjunction drop-down list.
14.Repeat Steps 2 through 5, typing the character string 'NewYork' instead of 'Boston'.
DB/Assist adds the second search condition to the current SELECT statement.
15.Select the Close push button or double-click on the system menu to close the WHERE Clause dialog box.
Building a Subquery
An expression in a WHERE clause can be a subquery. A subquery is a SELECT statement nested inside the WHERE clause of a parent SELECT statement.
The Subquery push button in the WHERE Clause dialog box allows you to use the statement construction dialog boxes to build a subquery in the Subquery Editor window. Follow the same procedures to use the dialog boxes as you would when building a regular SELECT statement.
You can nest a subquery up to five levels deep within a parent SELECT statement. To keep track of how many levels deep your subquery is nested, the Subquery Level indicator in the lower right of the Subquery Editor window displays a number from 1 to 5 to show the current nesting level. (See below for an illustration of the Subquery Level indicator in the Subquery Editor window.)
If you attempt to nest a subquery more than five levels deep within the parent SELECT statement, DB/Assist displays a message indicating that you can nest no deeper than five levels.
For example, the following SELECT statement uses a subquery to retrieve the name, job, and salary of all employees in Sales whose salary is greater than the salary of a manager.
SELECT STAFF.NAME, STAFF.JOB, STAFF.SALARY FROM STAFF
WHERE STAFF.JOB='Sales'
AND STAFF.SALARY >(SELECT STAFF.SALARY FROM STAFF WHERE STAFF.JOB='Mgr')
To build the subquery (shown in italics) in this statement, follow these steps:
1.If the WHERE Clause dialog box is not already open, open it by selecting SQL Statement Ø Where or the Where button.
The WHERE Clause dialog box appears with AND in the Conjunction drop-down list.
2.Select SALARY in the Column list box.
The qualified column name appears in the Expression 1 entry field.
16.Select the > operator from the Operator list box.
17.Position the cursor in the Expression 2 entry field.
The text of the subquery will appear in the Expression field that contains the cursor when you select the Subquery push button. Therefore, make sure the cursor is in the desired Expression field before you select the Subquery push button.
18.Select the Subquery push button.
The empty Subquery Editor window appears so you can build the subquery.
19.Use the statement construction dialog boxes to build the subquery. Follow the same procedures that you would use to build a regular SELECT statement.
If you need help building the SELECT statement portion of the subquery, SELECT STAFF.SALARY FROM STAFF, see
Building a Basic SELECT Statement.
If you need help building the WHERE clause portion of the subquery, WHERE STAFF JOB = 'Mgr', see Building a Basis WHERE Clause, earlier in this section.
As you build the subquery, the syntax appears in the Subquery Editor window as shown below. The Subquery Level indicator in the lower right of the window displays the number 1. This indicates that the current subquery is nested one level deep inside the parent SELECT statement.
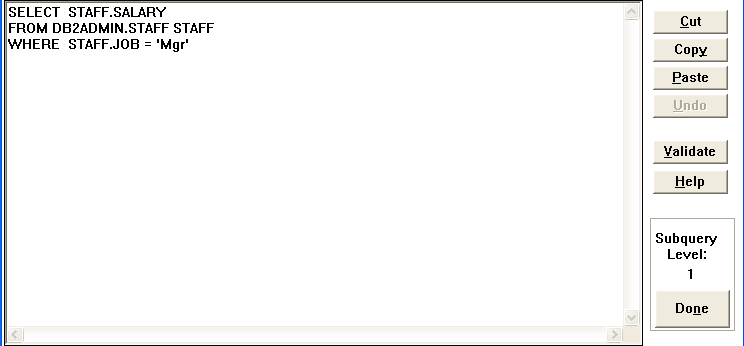
Subquery Editor Window with Subquery Level Indicator
20.Select the Done push button located below the Subquery Level indicator.
The subquery you typed appears in the Expression 2 field in the WHERE Clause dialog box, as shown below. DB/Assist encloses the subquery in parentheses.
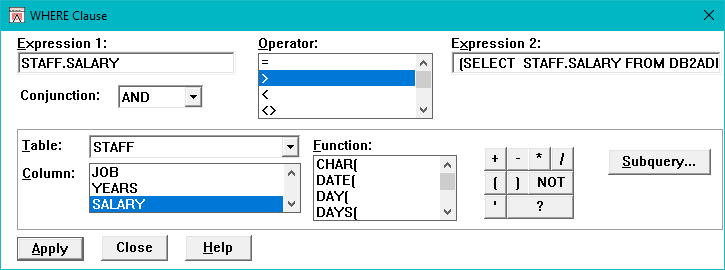
Subquery in WHERE Clause Dialog Box
21.Select the Apply push button. DB/Assist adds the subquery to the current SELECT statement.
22.Select the Close push button or double-click on the system menu to close the dialog box.
Using BETWEEN and NOT BETWEEN Operators
When you use either the BETWEEN or NOT BETWEEN operator in a WHERE clause, you need to specify a third expression in the WHERE clause dialog box.
For example, the following SELECT statement uses the BETWEEN operator to retrieve the ID, name, and salary of those employees whose salary is between 20,000 dollars and 21,000 dollars.
SELECT STAFF.ID, STAFF.NAME, STAFF.SALARY FROM DB2ADMIN.STAFF STAFF
WHERE STAFF.SALARY BETWEEN 20000 AND 21000
To build the WHERE clause (shown in italics) in this statement, follow these steps:
1.Select SQL Statement Ø Where or the Where button. The WHERE Clause dialog box appears.
2.Select SALARY in the Column list box.
The qualified column name appears in the Expression 1 entry field.
3.Select the BETWEEN operator from the Operator list box.
An entry field labeled AND appears below the Expression 2 entry field so you can enter the third expression for the WHERE clause.
4.Position the cursor in the Expression 2 entry field and type the number 20000. (You do not need to enclose numbers in single quotation marks.)
5.Position the cursor in the AND entry field and type the number 21000.
Below shows the completed WHERE Clause dialog box for this statement.
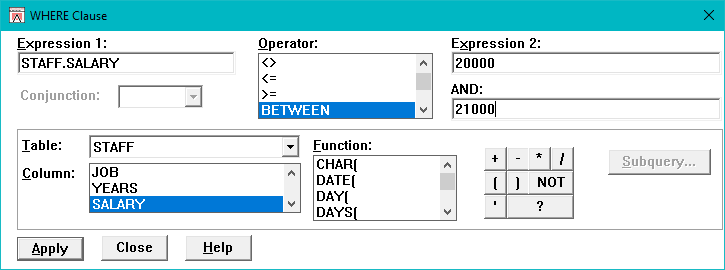
WHERE Clause Dialog Box for BETWEEN Operator
6.Select the Apply push button.
DB/Assist adds the WHERE clause to the current SELECT statement.
7.Select the Close push button or double-click on the system menu to close the dialog box.
Using EXISTS and NOT EXISTS Operators
When you use either the EXISTS or NOT EXISTS operator in a WHERE clause, you need to specify only one expression instead of two. This expression is always a subquery.
For example, the following SELECT statement uses the EXISTS operator to retrieve the ID and name of the employee in the Staff table who is in the same department as manager number 50:
SELECT STAFF.ID, STAFF.NAME FROM DB2ADMIN.STAFF STAFF
WHERE EXISTS
(SELECT ORG.DEPTNUMB FROM DB2ADMIN.ORG ORG, DB2ADMIN.STAFF STAFF
WHERE ORG.MANAGER = 50 AND ORG.DEPTNUMB = STAFF.DEPT)
To add the WHERE clause (shown in bold) to this SELECT statement, follow these steps:
1.Select SQL Statement Ø Where or the Where button. The WHERE Clause dialog box appears.
2.Select EXISTS in the Operator list box.
The Expression 1 entry field disappears, and the label of the Expression 2 field changes to Expression.
3.Make sure the cursor is in the Expression field so the text of the completed subquery will appear in this field.
4.Select the Subquery push button.
The empty Subquery Editor window appears so you can build the subquery.
5.Use the statement construction dialog boxes to build the subquery. Follow the same procedures that you would use to build a regular SELECT statement.
If you need help building the WHERE clause portion of the subquery, WHERE ORG.MANAGER = 50, see Building a Basis WHERE Clause, earlier in this section.
If you need help building the join clause portion of the subquery, ORG.DEPTNUMB = STAFF.DEPT, see Section Adding a Join Clause.
As you build the subquery, the syntax appears in the Subquery Editor window. The Subquery Level indicator shows the level at which the subquery is nested inside the parent SELECT statement. (For an illustration of the Subquery Editor window and Subquery Level indicator, see Subquery Editor Window with Subquery Level Indicator.)
6.Select the Done push button located below the Subquery Level indicator in the Subquery Editor Window.
The subquery you typed appears in the Expression field in the WHERE Clause dialog box, as shown below. DB/Assist encloses the subquery in parentheses.
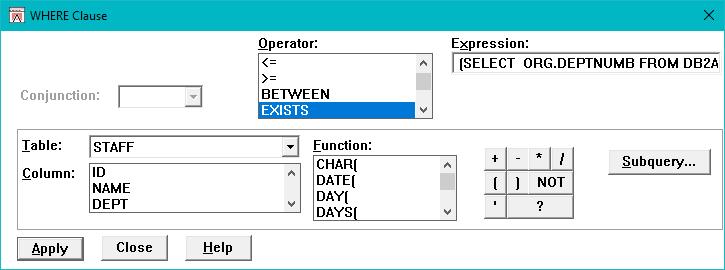
WHERE Clause Dialog Box for EXISTS Operator
1.Select the Apply push button. DB/Assist adds the subquery to the current SELECT statement.
2.Select the Close push button or double-click on the system menu to close the dialog box.