There are several ways that you can build a join clause as part of a SELECT statement in DB/Assist. A join clause lets you retrieve and manipulate data from multiple tables in a single SELECT statement.
The method you use to build the join clause depends on whether there is an existing relationship between the primary and foreign keys in the tables used in your SELECT statement, as follows:
•If a primary/foreign key relationship exists between the tables, you can automatically apply the join clause syntax based on those relationships, or build a join clause using the Join Clause dialog box.
•If no primary/foreign key relationship exists between the tables, you can build a join clause using the Join Clause dialog box.
The following sections describe these methods.
Automatically Applying a Join Clause
If there is a primary/foreign key relationship between the tables in your SELECT statement, we recommend that you automatically apply the join clause when you build the basic SELECT statement.
When you use this method, DB/Assist automatically builds the appropriate join clause and adds it to the current SELECT statement. The syntax of the join clause is determined by the primary and foreign key information defined for the tables in the database, and is based on relationships between single-column keys.
The following SELECT statement illustrates the procedure for automatically applying a join clause. The statement retrieves the department name and location from the Org table and the name and salary from the Staff table. (The join clause is shown in italics.)
SELECT ORG.DEPTNAME, ORG.LOCATION, STAFF.NAME, STAFF.SALARY
FROM DB2ADMIN.ORG ORG, DB2ADMIN.STAFF STAFF
WHERE ORG.DEPTNUMB = STAFF.DEPT
This example assumes that a primary/foreign key relationship exists in the SAMPLE database between the primary key column in the Org table, DEPTNUM , and the foreign key column in the Staff table, DEPT.
To create this relationship, we made the following changes to the SAMPLE database that comes with DB2:
•Defined DEPTNUMB as the primary key column in the Org table.
• Defined DEPT as the foreign key column in the Staff table. This foreign key points to the DEPTNUMB column in the Org table.
To automatically apply the join clause (shown in italics) to the SELECT statement, follow these steps.
This procedure assumes that you have already selected the columns for this statement from the Org and Staff tables in the SELECT/FROM Clause dialog box (If you need information about completing the SELECT/FROM Clause dialog box, see Selecting Tables and Columns for SELECT UPDATE and INSERT Statements.)
SELECT ORG.DEPTNAME, ORG.LOCATION, STAFF.NAME, STAFF.SALARY
FROM DB2ADMIN.ORG ORG, DB2ADMIN.STAFF STAFF
WHERE ORG.DEPTNUMB = STAFF.DEPT
1.Select the OK push button in the SELECT/FROM Clause dialog box after selecting columns from the Org and Staff tables.
DB/Assist adds the SELECT statement to the SQL Editor window and to the SAM that contains this statement.
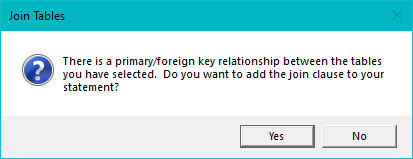
The Join Tables message box shown below appears, asking if you want to add the join clause to your statement.
Join Tables Message Box
2.Select the Yes push button in the Join Tables message box to automatically apply the join clause syntax to the SELECT statement.
DB/Assist adds the join clause to the SELECT statement in the SQL Editor window and to the SAM that contains this statement.
If you do not want to apply the join clause at this time, select the No push button.
If you select the No push button in the Join Tables message box, you can still use the Join Clause dialog box at a later time to build a join clause that is not based on a primary/foreign key relationship.
The next section describes how to use the Join Clause dialog box when no primary/foreign key relationship exists between the tables.
The only difference in this procedure when a primary/foreign key relationship does exist is that when you first open the Join Clause dialog box, the default relationship between the primary and foreign key columns is displayed graphically, as shown for the current example below.
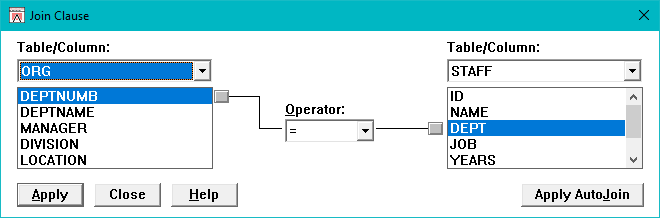
Join Clause Dialog Box with Default Relationship Shown
Using the Join Clause Dialog Box
Use the Join Clause dialog box to build the join clause if either of the following is true:
•There is no primary/foreign key relationship between the tables in your SELECT statement.
•You want to build a join clause that is not based on an existing primary/foreign key relationship.
Like the example in the preceding section, the following SELECT statement retrieves the department name and location from the Org table and the name and salary from the Staff table. However, in this example, the join clause joins the MANAGER column in Org and the ID column in Staff.
SELECT ORG.DEPTNAME, ORG.LOCATION, STAFF.NAME, STAFF.SALARY
FROM DB2ADMIN.ORG ORG, DB2ADMIN.STAFF STAFF
WHERE ORG.MANAGER = STAFF.ID
To build the join clause (shown in italics) in this statement, follow these steps. This procedure assumes that there is no primary/foreign key relationship between the Org and Staff tables.
1.Select SQL Statement Ø Join or the Join button.
The Join Clause dialog box appears. The tables you chose in the SELFCT/FROM Clause dialog box, Org and Staff, appear in the Table/Column drop-down lists. The columns in each table appear below the table name. The = operator appears in the Operator field by default. No graphical relationship is shown between the tables.
2.Select MANAGER from the ORG list.
3.If the operator you want is not displayed, select it from the Operator drop-down list. (This step is not required for the current example.)
4.Select ID from the STAFF list.
The Join Clause dialog box graphically displays the relationship between the columns you selected, as shown below.
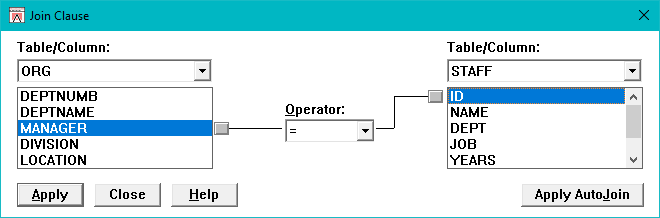
Join Clause Dialog Box with New Relationship Shown
5.Select the Apply push button.
DB/Assist adds the join clause to the SELECT statement in the SQL Editor window and to the SAM that contains this statement.
If the columns that you select to join have incompatible data types, DB/Assist displays an error message when you select the Apply push button, and does not allow you to create the invalid join clause. If this error message appears, rebuild the join clause choosing columns that have compatible data types.
To determine the data types of the columns in your tables, select Database 4 Schema to view the schema information for these tables, as described in Section 4.6.
6. Select the Close push button or double-click on the system menu to close the dialog box.
If you do not want to add the join clause to the current SELECT statement, select the Close push button at any time before selecting the Apply push button.
Apply AutoJoin
The Apply AutoJoin push button in the Join Clause dialog box allows you to automatically apply a join clause based on any single-column primary/foreign key relationships between your tables.
When you select the Apply AutoJoin push button, either of the following can happen:
•If there is a primary/foreign key relationship between the tables, selecting the Apply AutoJoin push button adds the join clause to your statement, as described in the preceding section. This gives the same result as selecting the Yes push button in the Join Tables message box
•If there is no primary/foreign key relationship between the tables, selecting the Apply AutoJoin pushbutton displays an error message.