You can use the GROUP BY Clause dialog box to build a GROUP BY clause as part of a multi-row SELECT statement. A GROUP BY clause divides a result set into groups of rows.
You cannot build a GROUP BY clause as part of a single-row SELECT statement.
When you build a GROUP BY clause, each column in the SELECT statement must either identify a grouping column or be part of a column function.
When you run a SQL statement that contains a GROUP BY clause, keep the following points in mind:
•In each group of more than one row, all values of each grouping column are equal.
•All rows with the same set of values of the grouping columns are in the same group.
•All null values within a grouping column are considered equal.
The following sections describe how to use the GROUP BY Clause dialog box to build the following:
•A basic GROUP BY clause
•A GROUP BY clause with a HAVING clause
The GROUP BY Clause dialog box can only display columns that are less than 255 characters in length. Therefore, if one of the columns in your SELECT statement is equal to or greater than 255 characters, DB/Assist cannot create the GROUP BY clause. In this situation, DB/Assist displays an error message when you attempt to open the GROUP BY Clause dialog box.
Building a Basic GROUP BY Clause
The following SELECT statement uses a GROUP BY clause to retrieve the average salary for each department within each division:
SELECT ORG.DEPTNAME, ORG.DIVISION, STAFF.SALARY FROM DB2ADMIN.ORG ORG, DB2ADMIN.STAFF STAFF
WHERE ORG.DEPTNUMB = STAFF.DEPT
GROUP BY ORG.DIVISION, ORG.DEPTNAME, STAFF.SALARY
To build the GROUP BY clause (shown in italics) in this statement, follow these steps:
1.Select SQL Statement Ø Group by or the Group by button.
The GROUP BY Clause dialog box appears, as shown below. The table you chose in the SELECT/FROM Clause dialog box appears in the Table/Columns drop-down list, and the columns in this table are listed below it. The Grouping Columns list box contains the names of the columns you chose in the SELECT/FROM Clause dialog box, excluding any computed columns.
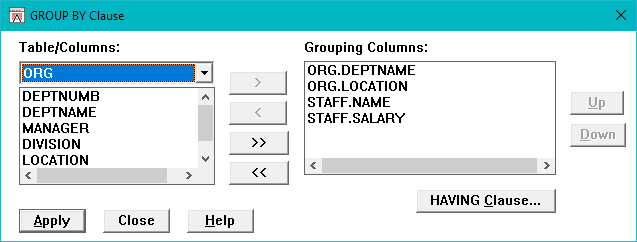
GROUP BY Clause Dialog Box
2.If the name of the table you want does not already appear in the Table/Columns field, select it from the drop-down list. (This step is not required for the current example.)
The columns in the table you select appear in the Table/Columns list.
3.If the names of the grouping columns you want do not already appear in the Grouping Columns list, select them from the Table/Columns list. (This step is not required for the current example.)
If you need information about selecting tables and columns, see Selecting Tables and Columns for SELECT UPDATE and INSERT Statements.
4.Use the Up and Down push buttons to move the grouping columns to the correct positions in the Grouping Columns list.
If you need information about using the Up and Down push buttons, see Rearranging Columns in the Selected Columns List Box.
To build the sample statement, move the ORG.DIVISION column up one position to the top of the list.
1.Select the Apply push button.
DB/Assist adds the GROUP BY clause to the current SELECT statement.
2.Select the Close push button or double-click on the system menu to close the dialog box.
Building a HAVING Clause
The HAVING Clause push button in the GROUP BY Clause dialog box allows you to build a HAVING clause as part of a GROUP BY clause. A HAVING clause is like a WHERE clause for groups in that it limits the groups retrieved in a GROUP BY clause, just as a WHERE clause limits the rows retrieved in a SELECT statement.
The HAVING Clause dialog box functions identically to the WHERE Clause dialog box, with one exception. You can specify one of the following column functions as a search condition in a HAVING clause, but you cannot do so when building a WHERE clause:
•AVG
•COUNT
•MAX
•MIN
•SUM
Therefore, the Function list box in the HAVING Clause dialog box includes these column functions, while the Function list box in the WHERE Clause dialog box does not.
This section gives a procedure for adding a simple HAVING clause to the SELECT statement built in the preceding section. However, all of the procedures described for using the WHERE Clause dialog box also apply to the HAVING Clause dialog box
Therefore, see Building a WHERE Clause, for complete information about the different ways that you can use the HAVING Clause dialog box
The following example adds a HAVING clause to the SELECT statement built in the preceding section. In this example, the HAVING clause eliminates those groups where the division is Corporate.
SELECT ORG.DEPTNAME, ORG.DIVISION, STAFF.SALARY FROM DB2ADMIN.ORG ORG, DB2ADMIN.STAFF STAFF
WHERE ORG.DEPTNUMB = STAFF.DEPT
GROUP BY ORG.DIVISION, ORG.DEPTNAME, STAFF.SALARY HAVING ORG.DIVISION<>'Corporate'
To build the HAVING clause (shown in italics) in this statement, follow these steps:
1.If the GROUP BY Clause dialog box is not already open, open it by selecting SQL Statement Ø Group by or the Group by button.
The GROUP BY Clause dialog box appears.
2.Select the HAVING Clause push button.
The HAVING Clause dialog box appears. The table you selected in the GROUP BY Clause dialog box appears in the Table drop-down list, and the columns in this table appear in the Column list box.
3.If the name of the table you want does not already appear in the Table field, select it from the Table drop-down list. (This step is not required for the current example.)
The columns in the table you select appear in the Column list box
5.Select DIVISION in the Column list box.
The qualified column name appears in the Expression 1 entry field.
6.Select the <> operator from the Operator list box.
7.Position the cursor in the Expression 2 entry field and type the character string 'Corporate', enclosing it in single quotation marks. (If you prefer, you can select the' symbol from the keypad instead of typing it.)
Below shows the completed HAVING Clause dialog box for this statement.
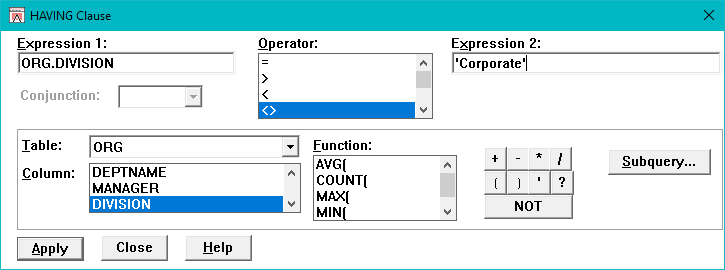
HAVING Clause Dialog Box
8.Select the Apply push button.
DB/Assists adds the HAVING clause to the current SELECT statement in the SQL Editor window and to the SAM that contains this statement.
9.Select the Close push button or double-click on the system menu to close the dialog box.
If you do not want to add the HAVING clause to the current SELECT statement, select the Close push button at any time before selecting the Apply push button.